One of my favorite time periods and places in history has always been Ancient Egypt, so I was a little bit giddy when I was assigned to review a complimentary copy of the Project Passport World History Study: Ancient Egypt from Home School in the Woods.

This hands-on history study is so neat, because it easily allowed me to combine my 3 oldest kids (ages 5, 8, and 10) to really start learning about life back then. They have been able to do fun writing prompts, try out traditional foods, make their own Ancient Egyptian using real cloth, and even make their own little passport to use at each “stop” of our journey.

Here is a video describing it further:
Organizing Our Project Passport World History Study
We received the download version of Project Passport World History Study: Ancient Egypt, which is Mac & PC compatible. There is also a CD version for just a dollar more if you’d prefer the hard copy. I saved the zip file to my Google Drive account so I would never lose it, even if my computer decided to crash.
The files are all contained within this download, and there was a lot of information that I had to go through. I decided to print out a good majority of the materials since this was my first time using a Home School in the Woods study.
I’ve heard of many experienced moms completely foregoing a teacher’s binder, but I wanted to have everything printed out and in one place. I do better with things in my hand rather than on a screen. When it is printed out and in front of me, I’m reminded to actually get it done!
For our study, I created a very large binder for myself with the main information as my teacher’s guide. I printed out the Introduction, Travel Tips, and Additional Resources Pages. These all went three-hole punched into the front of my binder.

Behind that, I printed out the Travel Planner: Quick Stop Itinerary. This helpful document gave a detailed snapshot of every single “Stop” (Lesson) of the journey. The planner said exactly what was needed and what we would be doing for every single lesson. For example, it let me know if there was going to be a game, an edible project, a lap book component, a postcard, or some other kind of experience during the lesson.
It also broke down every activity that is listed for that lesson by the title of the activity. There are 25 stops in this Ancient Egypt study, so it’s handy to have this information easily available to be able to quickly prepare for the next lesson.
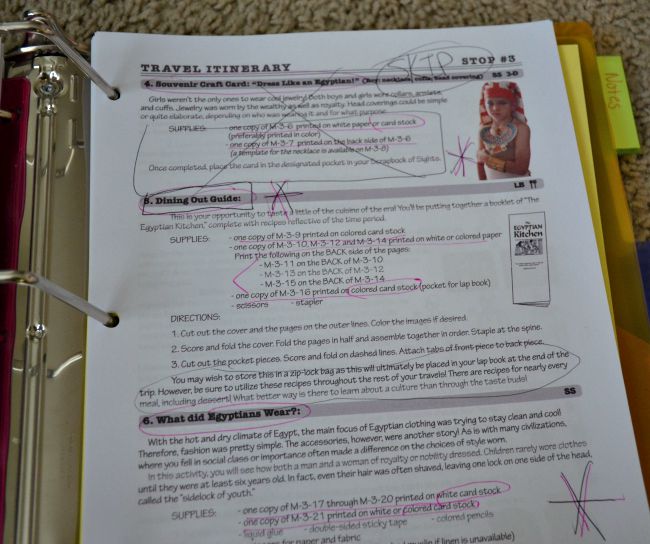
Next, I printed the full Travel Itinerary for each Stop (lesson). These are the detailed lesson plans that tell you exactly what to do, step by step. They are very intricate and even include several pictures to help guide you. In fact, the instructions even say exactly what to print out for different lessons and on what kind of paper (card stock, white paper, colored paper, or colored card stock).
At first, this was overwhelming for me, so I decided to ONLY print out copies of things for 2-3 stops at a time. I also got really serious about which activities I wanted my kids to actually do versus everything that was listed.
All materials needed for the lessons were either listed on the full Travel Itinerary or in the specific pages that were listed as needing to be printed. These were easy to find in the file download as they were listed specifically by type and page. The supplies listed were all common items, but some required a bit of planning or purchasing. I found it very important to pre-read the information for each stop at least a week in advance so I could be prepared.
Note: If there are things you really just can’t get (as far as supplies) or things don’t want to do, it is a flexible study. Skip what you want and give the rest your all! No matter what, as long as you are doing at least a few activities per stop, your kids will really learn and enjoy finding out about Ancient Egypt.
Using Project Passport World History Study: Ancient Egypt
Honestly, I have some limitations on how many projects and assignments to do with the kids for my own sanity. Sadly, my children didn’t get to “Dress Like an Egyptian!” as described in Stop 3. However, they did get to do the What did Egyptians Wear?” activity at the same stop and were able to accessorize paper doll Egyptians.
I even got real fabric for them to use and everything. Anyone who knows me knows what a stretch it is for me to go to the trouble to let my kids do a lot of arts and crafts. With a baby and a naughty 3 year old in the house, it can be a lot of trouble. This program made it so easy to implement activities I wouldn’t normally introduce to my kids and made it fun.
We’re still working through the stops so they are continuing to enjoy the journey, both together and separately. The writing assignments have been assigned to them individually. I helped my 5 year old since he isn’t a strong writer yet, which is fine. He dictated what he wanted his paper to say, and I wrote it for him.
It has been interesting to see how well my 8 and 10 year olds have been able to understand and apply their new knowledge to the assignments. They even talk about their history lessons at other times during the week like it’s the coolest new thing. That’s probably because it is, right?
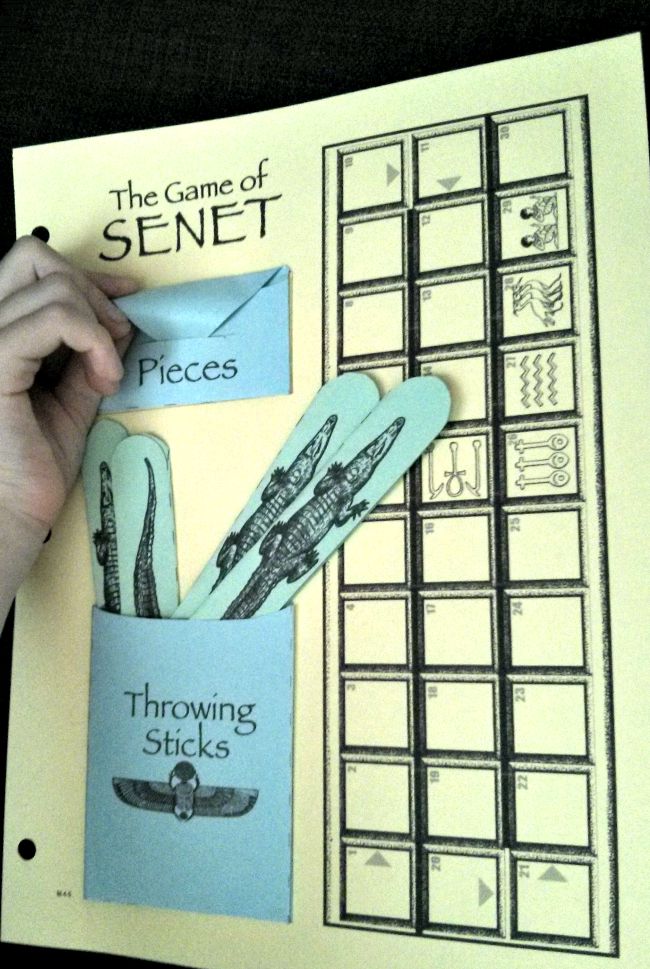
I have had them do some things together, as well. For example, they share the copy of The Game of Senet and have been trying to learn to play that well. All of the pieces were easy to print out and cut, and little envelopes were even included to glue onto the game board paper for easy storage. You see what I mean about this program thinking about everything? I love the inclusiveness of it!
We used the program 2-3 times a week and did 1-4 activities each time. Since it is summer and we have done a lot less school over the past few months, I tried to do 1 stop per week total, and that kept us plenty busy.

We still have many stops left to complete, and we’re enjoying taking our time going through it. We start our regular school year up in full force next month, and I plan on going through the stops quicker at that time. I don’t want to drag it out for so long that the kids forget what they’ve learned earlier on. However, even that wouldn’t be as likely because of the lap book component in this study.
Throughout the stops, my students have been creating pieces of a lap book to assemble at the end. This will be an excellent way for them to review and “relive” their studies as we wrap it all up.
Final Thoughts
We really enjoyed this program. It takes a bit more effort to put together, but the awesome thing is that it is so thorough and hits all of the different learning styles. It allows students to get hands-on with history assignments through recipes, building projects, listening to audio tours (found in the files/on the CD), writing assignments, playing games, and immersing themselves in the culture they have learned about. It brings history to life.
There are multiple activities per lesson for students to complete. You really could spend a lot of time on every stop by including some of the Additional Resources they suggest or adding in your favorite books, videos, websites, or music.
I loved being able to combine my children to learn about something. They liked all of the fun details that were included, like collecting postcards and souvenirs and gifts along the journey. Instead of history being abstract and foreign, it became real and significant to them through the projects.

The program can be catered to many ages, from early elementary to middle school. Everyone can learn and participate at their own level and abilities. Each person will experience this learning journey in their own way. Kids learn by doing, and I promise they will learn a lot with this Home School in the Woods study.
We love it and can’t wait to finish this one so we can start another one!
Find out what other families thought about this Passport World History Study, as well as the ones for The Middle Ages and Renaissance & Reformation. Click the banner below.


[…] with the last Homeschool in the Woods product I reviewed, there is a lot of printing and prep work involved. However, the time spent to […]